Choosing the right temperature test chamber can seem hard. Many companies have trouble picking the best chamber size. They also must choose between air-cooled or water-cooled condensers. It is important to match power capacity to the device’s needs. Picking the wrong one can waste time or cost more money. I use a guide to help match chamber features to testing needs now and later. Performance, reliability, and industry rules affect every chamber choice.
I suggest you start by knowing your testing goals and your product’s properties.
Key Takeaways
Pick a chamber size that fits your product and tests. The chamber should be 3 to 5 times bigger than your sample. This helps air move well and gives correct results.
Make sure the chamber’s temperature range matches your needs. Check if it has the right humidity control and ramp rates. These should fit your product and industry rules. This helps you get good and true test results.
Find chambers with strong control systems and safety features. Look for things like door locks and alarms. These keep tests steady and protect your team and samples.
Take care of your chamber by cleaning and checking it often. Calibrate and look at parts to make sure it lasts long and works well.
Choose vendors who give fast help, training, and good warranties. This keeps your chamber working and stops costly problems.
Selection Basics
Application Needs
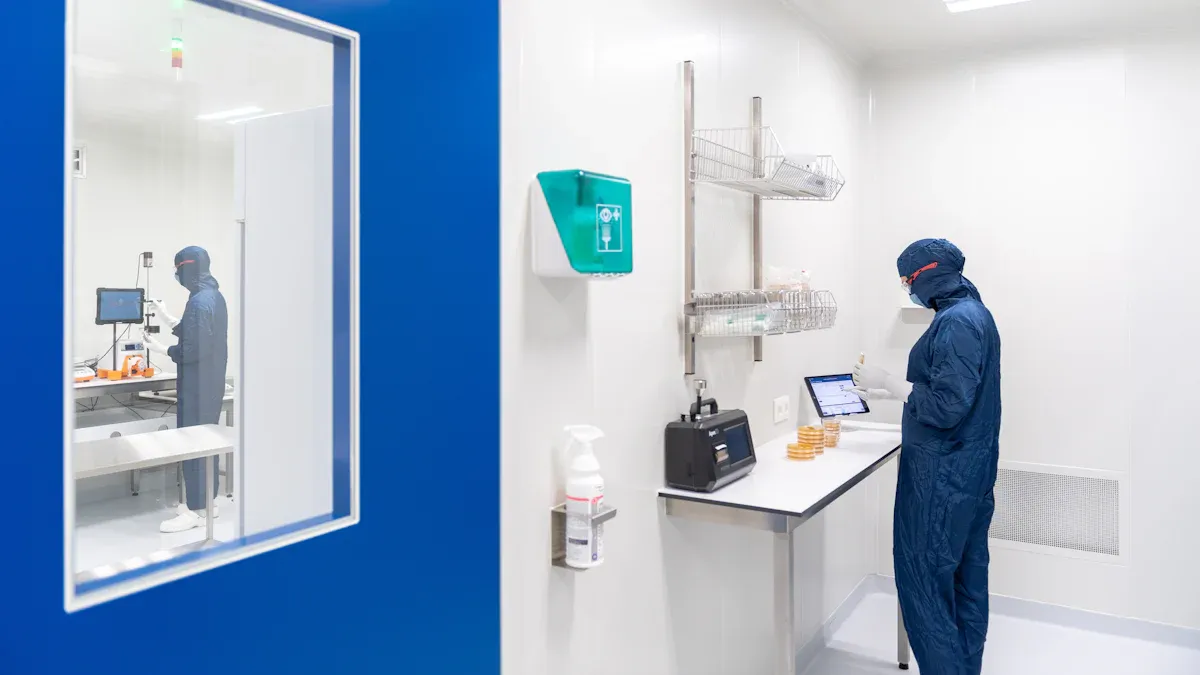
When I pick a temperature test chamber, I first think about what I need it for. Different industries have different needs. I ask myself what products I will test. I also check how big these products are. If I test small parts or do research, I use benchtop equipment. For bigger items or many products, I look for walk-in or drive-in chambers. Some tests need humidity control, like for electronics or medicine. I also check how much space and power I have in my lab. These things help me choose the right chamber for my work.
Here is a table that shows how different needs fit with chamber types:
Chamber Type | Application Scenario | Key Features | Suitable Model Use Case |
Benchtop Chamber | Small samples, R&D | Compact, precise control | Electronics, plastics, lab tests |
Walk-in Chamber | Medium to large products, batches | Large space, uniform temperature | Automotive, appliances |
Drive-in Chamber | Whole vehicles, large equipment | Very large, rapid temperature change | Rail, military, automotive |
I always make sure the chamber size fits my products and test setup. Sometimes, I need special features like vibration for car or plane tests.
Test Parameters
After that, I look at what my tests need. I check the temperature range I want. Some tests need very cold or very hot settings. For example, electronics may need -78°C to +150°C. I also look at the humidity range, which can be from 15% to 95%. I think about how fast the chamber can change temperature. Faster changes help with quick tests but may cost more.
I check the rules for my industry. Electronics use IPC-9592A and JEDEC standards. Cars use ISO and SAE rules. Medicine needs strict stability tests. I make sure my chamber meets these rules. I also look for things like data logging and easy controls. These help me run good tests and keep records.
Tip: Always match your test needs to your product and industry rules. This helps you get correct results and follow the rules.
Temperature Test Chamber Features
Temperature Range
I always check the temperature range first. This shows the highest and lowest temperatures the chamber can reach. The temperature range tells me what products I can test. It also helps me know which standards I can meet. For electronics, I need a chamber from -65°C to +150°C. For car parts, I look for -40°C to +85°C. Aerospace chambers need even wider ranges, like -70°C to +200°C. The highest and lowest temperatures are both important. They show what the chamber can do.
Here is a table that lists common temperature ranges for different chambers:
Chamber Type / Industry Application | Typical Temperature Range (°C) |
Standard Reach-In Test Chambers | -40 to +180 |
Specialized Reach-In Test Chambers | -70 to +200 or beyond |
Automotive Testing | -40 to +85 |
Electronics Testing | -65 to +150 |
Pharmaceutical & Biotechnology | +2 to +40 (typical), -20 to +60 (specialized) |
I always pick a chamber with the right range for my product. If I need to test for very hot or cold, I choose a chamber with a wide range. This helps me copy real-world conditions and see if my products will last. In aerospace and cars, a wide range is very important. These tests show how parts react to quick changes. This can help find hidden problems. I use a chamber with a big range to make sure my tests are good.
Note: The right temperature range helps my products pass safety and quality checks. I always look at the highest temperature and the range before I buy.
Ramp Rates
Ramp rate means how fast the temperature changes in the chamber. I use ramp rates to control how quickly the chamber heats or cools. Fast ramp rates are needed for some tests, like thermal shock tests. Some rules, like IEC 60068-2-14, need ramp rates up to 20°C per minute. I pick the ramp rate based on my product and test.
Here is a chart that shows ramp rate levels for testing chambers:
Ramp rates change how accurate and reliable my tests are. Slow ramp rates help samples reach balance and give better results. Fast ramp rates can cause thermal shock and show weak spots. If the ramp rate is too high, I might get errors. I always set the ramp rate for my product and test.
Here are some things I think about:
Ramp rate controls how fast the chamber changes temperature.
Slow ramp rates help samples balance and improve results.
Fast ramp rates can show problems but may lower reliability.
I always check my chamber and get my samples ready for the best results.
I also check the chamber’s range to make sure it can handle the ramp rates I need. The right ramp rate helps me copy real-world conditions and follow rules.
Control Systems
Control systems are like the brain of the chamber. They keep the temperature and humidity steady during tests. Most chambers use electric heaters and sealed cooling systems. Some use liquid nitrogen or CO2 for faster cooling. Fans and baffles move air inside to keep the temperature even.
Most control systems use software to manage temperature and humidity. I like chambers with remote monitoring. This lets me check my tests from anywhere and stop them if needed. Advanced systems use special controls, like PID and cascade control, to keep the temperature steady. These systems use sensors near the heater, cooler, or on the product. This helps the chamber reach the set temperature fast and avoid going too high.
A good control system means I can trust my test results. I always look for strong temperature control and a wide range. This helps me know my products will work well in any climate chamber or environmental test chamber.
High and Low Temperature Testing
Performance
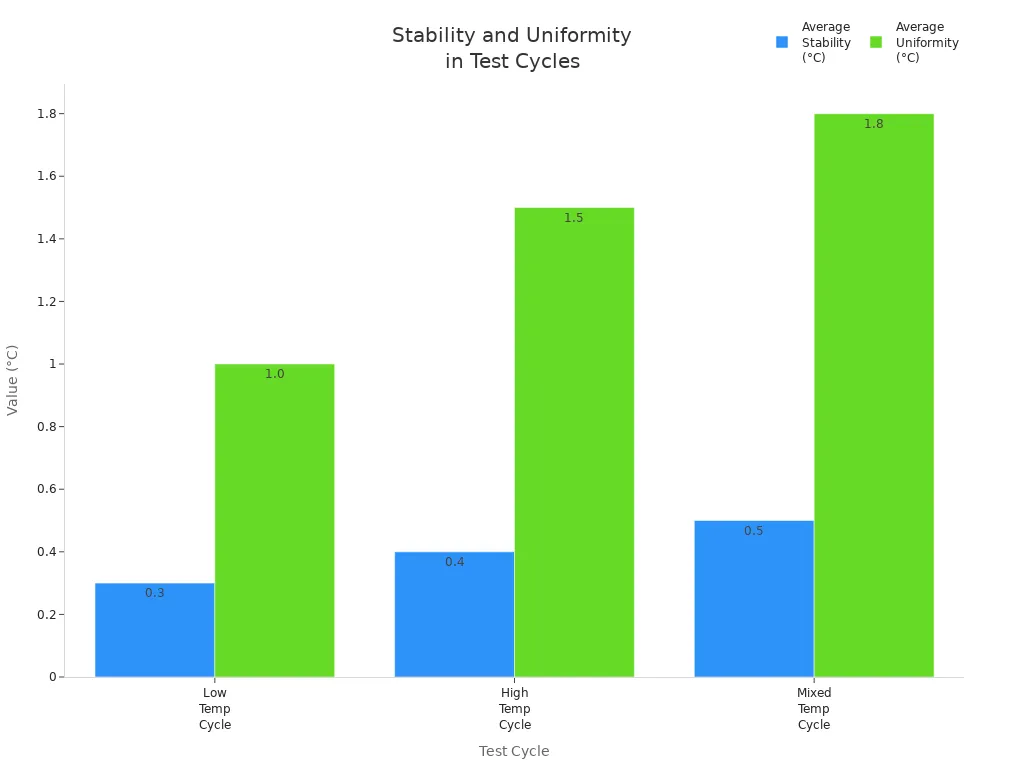
When I test products in hot and cold places, I check how well the chamber works. I want to know if my products can handle both heat and cold. High and low temperature testing helps me see if electronics, plastics, or car parts work in real life. I use chambers that go from -70°C to +150°C. I look for temperature stability, which means the chamber keeps the same temperature, usually within ±0.5°C. I also check temperature uniformity, so every spot inside stays close to the same temperature.
Here is a table that shows the main things I look at:
Metric | Description | Example Value |
Temperature Range | Lowest to highest temperature | -70°C to +150°C |
Temperature Stability | How steady the temperature stays | ±0.5°C |
Temperature Uniformity | How even the temperature is inside | ±2°C |
Humidity Range | Lowest to highest humidity | 20% to 98% RH |
Humidity Stability | How steady the humidity stays | ±2% RH |
Temperature Change Rate | How fast the temperature changes | 5°C/min |
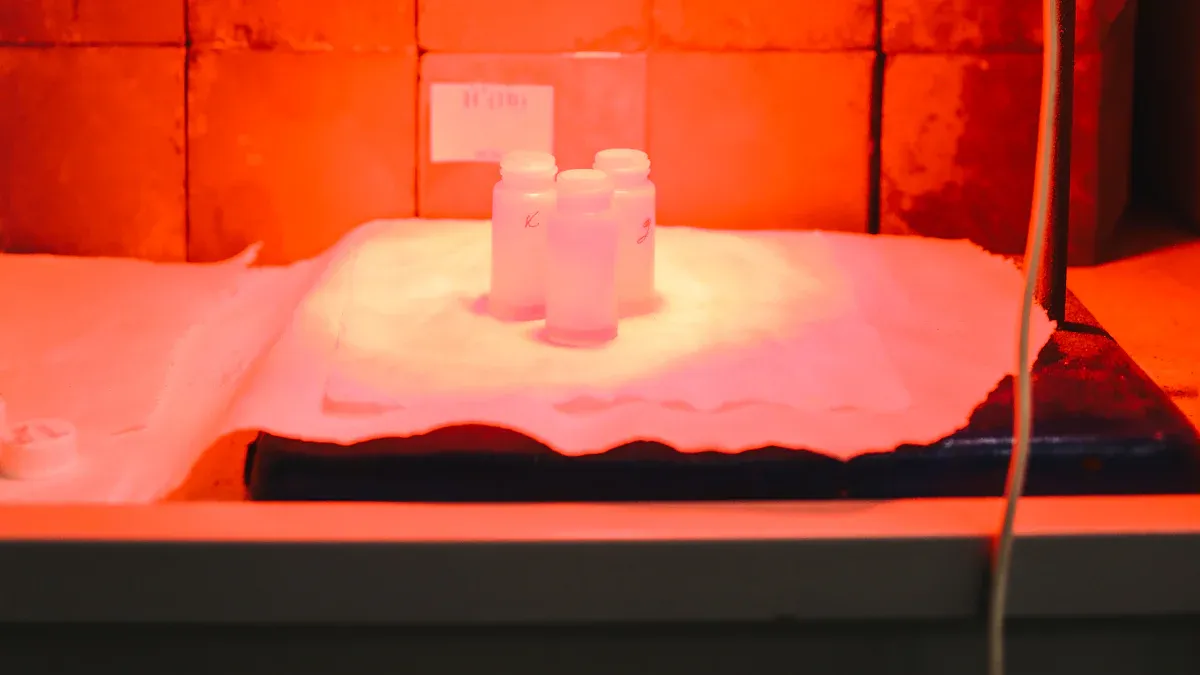
I always run tests that are like real use. For example, I might keep a product at 70°C for two hours, then change to -20°C for two more hours. I watch for cracks, melting, or other changes. I also use test cycles to see how products react to many changes. This helps me find weak spots and make products better for tough places.
Reliability
Reliability is very important when I want my products to last in hot and cold places. I follow strict rules like IEC 60068 and MIL-STD-810. These rules help me make sure my chambers give the same results every time. I use high and low temperature testing to look for problems like brittleness, cracking, or swelling. I also check for electrical failures in electronics and loss of stretch in rubber.
Here is a table of the main rules I use for reliability:
Standard | Application Area | Key Reliability Requirements |
IEC 60068 | Electronics | Tests for cold, heat, humidity, and temperature changes |
MIL-STD-810 | Military, aerospace | Checks for heat, cold, humidity, altitude, shock, vibration |
ASTM D5032 | Materials | Simulates UV, heat/cold, and moisture effects |
SAE J2527 | Automotive | Tests for sunlight, rain, and temperature changes |
CSA/UL | Safety, performance | Ensures safety and durability in harsh conditions |
ISO 14644 | Cleanrooms | Controls air cleanliness and temperature |
I sometimes use low air pressure with high and low temperature testing for aerospace or military products. This helps me see if my products work at high places. I use chambers with controls, safety features, and even temperature inside. I always check for surface problems, cracks, or loss of function after each test. This way, I know my products can survive in any hot or cold place.
Temperature Humidity Chamber Options
Humidity Control
When I pick a temperature humidity chamber, I look at how it controls humidity. Good humidity control helps me make the right test setting. Many chambers use special systems like vapor generators and high humidity sensors. Some also use dry air purges. These systems let me set humidity from 10% to 98%. Some chambers use high-pressure steam for high humidity. Others use desiccant air dryers or dry nitrogen to lower humidity for special tests.
Stability chambers often use ultrasonic humidification. This method gives great humidity control and saves energy. Heated humidified incubators help keep both temperature and humidity steady. They can hold up to 90% humidity at 21°C. Environmental chambers let me change humidity control. They can reach up to 90% at a 40°C dew point. I always check if the chamber has even airflow. Special airflow designs help spread humidity everywhere. This is important for good test results.
Here is a table that shows common humidity control technologies:
Technology | Description | Humidity Range / Feature |
Vapor Generator System | Uses heated, treated water to create vapor that mixes with air. | Controls RH from 10% to 98% |
High Humidity Sensors | Measures humidity up to 98% RH for precise readings. | Enables high humidity measurement |
Dry Air Purge via Desiccant | Removes moisture from air before it enters the chamber. | Achieves low humidity as low as 5% RH |
Dry Nitrogen Purges | Pushes out moist air to prevent condensation and oxidation. | Used at low and high temperatures |
Recirculating Desiccant Dryers | Circulates air through desiccant and returns it to the chamber. | Good for larger chambers |
Tip: I always use humidity mapping to check if the chamber keeps the same humidity in every part of the workspace.
Chamber Size
Chamber size is very important when I plan my tests. If the chamber is too small, samples can block airflow. This can cause uneven temperature and humidity. If the chamber is too big, I might waste energy. I could also get different temperatures in the center and at the walls. The best chamber size is three to five times bigger than my test sample. This helps keep conditions even and follow test rules.
I also watch the load volume. I never let my samples fill more than one-fifth of the chamber. I keep the load area in any cross-section under one-third. This keeps airflow smooth and helps the chamber work well. I limit the total load mass to 80 kg for each cubic meter of test space. I also check wind speed inside the chamber. Lower wind speeds, less than 1.7 meters per second, help me get better results. For fast temperature changes, I may use higher wind speeds. But I know this can make the air less even.
Humidity controlled chambers work best when the chamber size matches my testing needs. This way, I get good data and save energy.
Climate Chamber Considerations
Energy Efficiency
I always check energy efficiency first when picking a climate chamber. Climate chambers can use a lot of power if tests run for hours. I want a chamber that keeps my energy bills low. This also helps the environment. I look at the insulation in the chamber walls. Good insulation keeps the temperature steady. It also stops energy from leaking out. I search for chambers with energy-saving compressors and heaters. These parts use less electricity but still work well.
I pay attention to the control system too. Smart controls can change power use during each test. This means the chamber does not waste energy when it is not needed. I also check for LED lights and efficient fans in the chamber. These small things can save a lot of energy over time. I always ask about the average power use for each chamber model. Using less energy means lower costs for me. It also means less harm to the planet.
Tip: I always compare energy ratings before I buy a climate chamber. This helps me pick the best choice for saving money and the environment.
Construction Quality
Good construction is very important when I pick a climate chamber. A strong chamber lasts longer and needs fewer repairs. I look for tough materials in the walls, doors, and seals. Good insulation and tight seals keep the chamber working well. They also stop leaks. If the chamber uses high-quality parts, it keeps temperature and humidity steady. This means my tests stay correct.
Regular care helps my chamber last longer and work better. If I take care of it, I can find problems early. This helps me avoid big repairs. Poor construction makes the chamber break down more often. This leads to bad test results and higher repair costs. I always check the design and build before I buy.
Here are some things I look for in a good climate chamber:
Strong compressors, heaters, and humidifiers for steady conditions and long life.
Good insulation and seals to stop leaks and drafts.
Even temperature and humidity control to avoid problems.
Tough materials and smart design for less care needed.
Bad construction causes more breakdowns, poor results, and higher costs.
A strong climate chamber saves me money over time. I spend less on repairs and get better test results. When I buy a high-quality chamber, I know it will help my work for many years. I always pick chambers with the best build to protect my money and get top results.
Specifications
Compliance
When I pick a temperature test chamber, I always check if it follows important standards. These standards help make sure my tests are right and my products are safe to sell. I look for chambers that follow rules from groups like ISO, FDA, and ASTM. If my chamber meets these rules, it can pass checks and help get my products approved.
Here are some main standards I look for:
ICH Q1A(R2): Sets rules for testing medicine stability with strict temperature and humidity.
FDA cGMP Regulations: Need good control of the environment, data logs, and alarms.
ISO 17025: Makes sure labs use equipment that is correct and reliable.
ISO 14644: Controls clean air for cleanroom tests.
ASTM D4332: Gives test rules for packaging materials.
GMP and GLP: Want regular calibration and good records.
I also check these technical details:
Standard | Focus Area | Temperature Range | Key Application |
ISO 16750 Series | Automotive testing | -40°C to +150°C | Car electronics and parts |
ISO 17025 | Lab calibration and competence | N/A | Reliable measurements |
ISO 14644 | Cleanroom and contamination | N/A | Clean air in sensitive tests |
I always make sure my chamber can keep temperature within ±0.5°C and humidity within ±2% RH. I plan to calibrate temperature every year and humidity every six months. This helps keep my tests right and ready for any check.
Safety
Safety is very important when I use a temperature test chamber. I want to keep myself and my samples safe. I look for chambers with strong safety features to lower risks during tests.
Some important safety features I check are:
Door interlocks that turn off power if I open the door.
Back covers to protect me from moving parts.
Pressure alarms and relief ports to stop dangerous pressure.
Explosion vents and strong doors for extra safety.
Heater limiters to stop overheating.
Emergency stop buttons for quick shutdowns.
Automatic door locks during tests.
Loud and bright alarms to warn me of problems.
Fire systems, like CO2 or water, for emergencies.
Tip: I always test the safety systems before I start new tests. This keeps me and my team safe.
By picking a chamber with these features, I know I can test with less worry. Good safety design also protects my products and keeps my lab working well.
Customization
Special Features
Sometimes, I need to change temperature test chambers for special tests. Each lab and industry needs different things, so I look for features that help me work better and get good results. Here are some choices I think about when I want to change a chamber:
Custom doors, like ones that open from the left or split in the middle, help me fit the chamber in small spaces.
I can add ports in many shapes and sizes, or put in special windows, so I can run cables or watch my samples.
Removable electrical parts and compressor units make fixing the chamber fast and easy.
Portable chambers let me set up tests anywhere I want.
Safety features, like special door locks, keep my team and samples safe.
Some chambers can go to very low temperatures, like -86°C, or very low humidity, like 10%.
Programmable controls let me make test plans, save data, use USB to move results, and pick the language I want.
I can change the chamber size or add holders for odd-shaped items or small labs.
Multi-zone testing lets me do more than one test at once in the same chamber.
Overheat protection, emergency stop buttons, and auto shut-off keep my lab safe.
I often work with engineers to make custom plans, using computer drawings and live changes.
Tip: I always talk to experts to make sure my custom chamber does everything I need.
Integration
I want my temperature test chamber to work well with my lab’s computer systems. Connecting to a laboratory information management system (LIMS) helps me track and save test data without mistakes. I check if the chamber can link to my LIMS for automatic data saving. This saves time and makes my results more correct.
I make sure my chamber works with my lab’s software.
I pick LIMS that can watch temperature and humidity all the time.
Automatic data saving from the chamber stops mistakes and keeps my records right.
I set up the LIMS to fit how my lab works.
I work with tech support to fix any problems with connecting.
I teach my team so everyone can use the new system easily.
When I connect my chamber to a LIMS, I can keep records and make reports for rules. This is very important for labs that must follow strict rules, like medicine testing. Connecting systems makes my work faster, safer, and more trustworthy.
Installation
Facility Needs
Before I install a temperature test chamber, I always check if my facility meets the right requirements. I want to make sure the chamber works well and stays safe. I use a checklist to help me get ready. Here is a table that shows what I look for:
Facility Requirement Category | Details |
Floor Space and Clearance | I need enough room for the chamber and at least 3 feet (1 meter) around it for easy service. |
Floor Pit Consideration | If I load big or heavy items often, I plan for a floor pit. This helps align the chamber floor with the room. |
Compliance | I follow all local codes and safety rules for my equipment. |
Cooling System Requirements | For water-cooled chambers, I use clean water between 5 and 30°C (41–85°F), with a pressure difference of 200 kPa (30 psi), and a steady flow. |
Cooling System Alternatives | For small chambers, I use air-cooled systems. For large ones, I may need outside cooling like evaporative or chilled coolers. |
Installation Support | I work with experts who help with planning, meetings, and drawings for the setup. |
Tip: I always double-check these needs before I start. This helps me avoid problems and keeps my chamber running smoothly.
Maintenance
Keeping my temperature test chamber in top shape is very important. I follow a regular maintenance schedule to make sure it works right and lasts longer. Here is how I take care of my chamber:
I clean the inside and outside often to remove dust and dirt.
I replace humidity water filters as the manual says to stop mineral buildup.
I check and clean the drain system to keep water flowing well.
I follow the maker’s schedule for safety checks and repairs.
I set up professional service visits for deep cleaning and checks.
I calibrate the chamber every 6 to 12 months to keep tests accurate.
Before each test, I run the chamber to make sure it works right.
Every few months, I check and clean the condenser fins and look for leaks.
I inspect door seals and moving parts, adding oil if needed.
I compare temperature readings on the main and limit controllers to spot sensor problems.
Note: Regular care helps me catch small issues before they become big problems. This keeps my tests safe and my chamber working well.
Vendor Selection
Support
When I want to buy temperature test chamber equipment, I check the vendor’s support first. Good support helps me fix problems fast and keep my tests going. I look for vendors who answer quickly, usually in one day. I want technical engineers who can help me at my lab or online. This means I can get help no matter where my lab is.
I ask if they have spare parts ready to ship. Vendors should have a list of parts and send them fast. I like vendors who give technical help for as long as I own the chamber. Training is important too. I want lessons on how to use, program, and take care of the chamber. Some vendors give special training online or in person. I also check if they offer calibration and regular maintenance. These services help my chamber last longer and work better.
Here is a checklist I use when I check vendor support:
Quick answers (online: 24 hours or less, in person: 2–3 days)
Technical engineers for help
Spare parts always ready and shipped fast
Lifetime technical help and regular lessons
Calibration and regular maintenance
Easy-to-fix design and parts you can reach
Tip: I always ask for a demo or a drawing to see if the chamber is easy to take care of.
Warranty
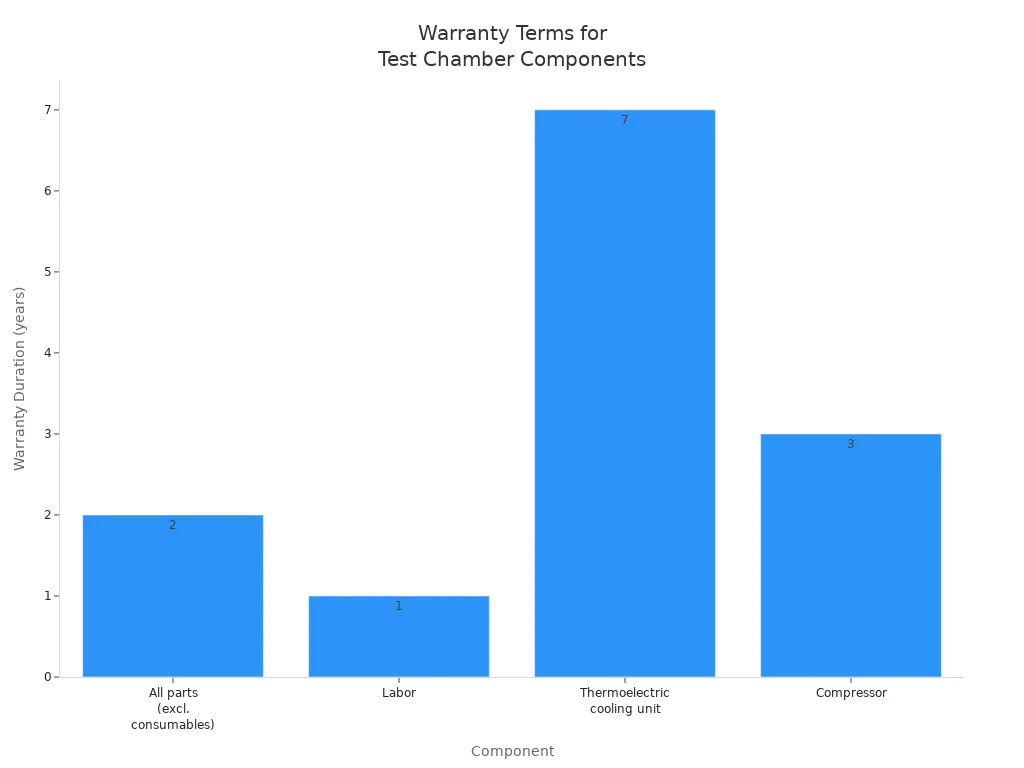
Warranty is very important when I pick a vendor. I want to know how long the warranty lasts and what it covers. Most vendors give 1 to 3 years for parts and labor. Some cooling units have a longer warranty, up to 7 years. I check if I can buy more coverage for important parts. I also want technical help for as long as I have the chamber.
Here is a table that shows common warranty times:
Component | Warranty Duration |
All parts (not consumables) | 2 years |
Labor | 1 year |
Thermoelectric cooling unit | 7 years |
Compressor | 3 years |
I always read the warranty rules carefully. I make sure I understand what is covered and that it is in writing. Extra warranty choices help me feel safe. Good warranty and support help me avoid problems and keep my lab working well.
When I choose a temperature test chamber, I follow these steps to get the best results:
I define the type of testing I need, like temperature or humidity.
I check the size and shape of my samples.
I make sure the chamber meets important standards.
I look for strong control systems and safety features.
I talk with experts to match the chamber to my goals.
I always use a checklist and ask questions before I decide. If you want to start your selection process, reach out today for expert help.
FAQ
What size temperature test chamber do I need?
I pick a chamber that is three times bigger than my biggest sample. This makes sure air moves well and tests are right. I also check that my samples do not block vents or sensors.
How often should I calibrate my chamber?
I calibrate my chamber every six to twelve months. Regular calibration keeps my test results correct. I follow my industry’s rules and the chamber’s manual for the best schedule.
Can I run both temperature and humidity tests in one chamber?
Yes, I use a temperature humidity chamber for both tests. I set the temperature and humidity I need. This helps me save space and time in my lab.
What safety features should I look for?
I look for door interlocks, emergency stop buttons, and alarms. These features keep me and my samples safe during tests. I always check safety systems before I start new work.
How do I maintain my temperature test chamber?
I clean the chamber often and check seals. I replace filters when needed and plan service visits. Regular care helps my chamber last longer and keeps my tests reliable.